Part 4 - Debugging "Hello World"
For a complete table of contents of all the lessons please click below as it will give you a brief of each lesson in addition to the topics it will cover. https://github.com/mytechnotalent/hacking\_c-\_arm64
Today we are going to debug our first program utilizing our dev build of Radare2.
To begin let's open up our binary in Radare2.
radare2 ./0x01_asm_64_helloworld
Let's take advantage of Radare2's auto analysis feature.
aaa
The next thing we want to do logically is fire up the program in debug mode so it maps the raw machine code from disk to a running process.
ood
Now that we have a running instance we can seek to the main entry point of the binary.
s main
Let us take an initial examination by doing the following.
v
The output from Radare2 is entirely too large to display in this course however as you follow along in your own environment you will be able to follow along. We will keep this convention throughout this course for better readability of the document.
Remember there is a difference between an executable on disk and what resides when it is mapped. When it is on disk it is referred to as unmapped. We will look at that at the end of the lesson. For now we are looking at a mapped version as you see it is an offset of the mapped code we will examine later.
Do you notice that as your mapped memory values are different than mine? That is because of ALSR.
Address Space Layout Randomization (ASLR) is a security technique used in operating systems, first implemented in 2001. The current versions of all major operating systems (iOS, Android, Windows, macOS, and Linux) feature ASLR protection.
ASLR is primarily used to protect against buffer overflow attacks. In a buffer overflow, attackers feed a function as much junk data as it can handle, followed by a malicious payload.
We notice in my mapped memory that at address 0x55629cab48 we see our string "Hello World!". You will have a different offset as we discussed but will find the same result.
Let us get back to a console window by doing the following.
q
Let's verify our initial analysis.
[0x55629ca9e4]> ps @0x55629cab48
Hello World!
[0x55629ca9e4]>
We can see that it is in fact true that at the mapped memory address of 0x55629cab48 we see the string "Hello World!".
Let's also look at the hex view so we can see and better understand what is going on at the machine code level.
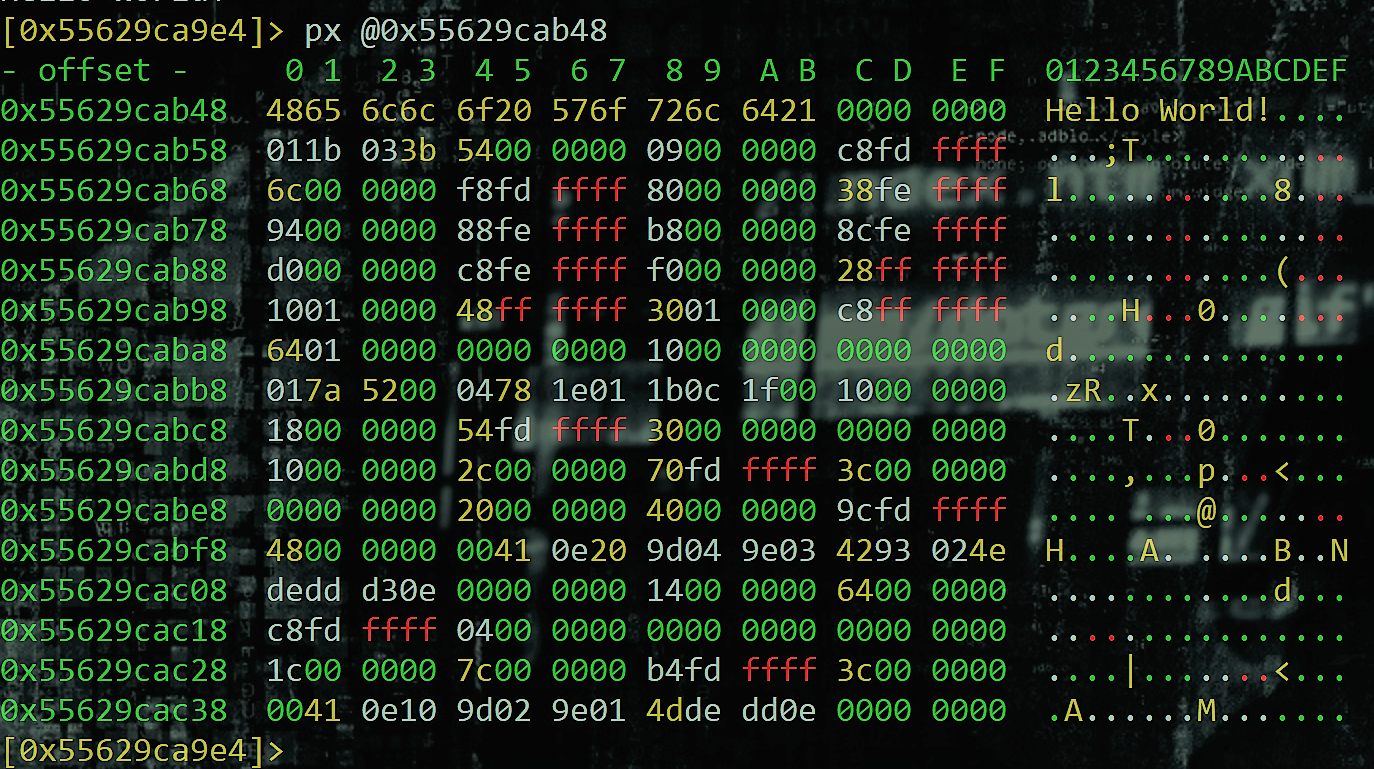
px @0x55629cab48
We see our "Hello World!" string and we can again see that it exists starting at the mapped memory address of 0x55629cab48.
We see that our machine code instructions are 16 bytes long or 64-bits long as we can see the first column start at 48 and end with 00.
It is VERY important we understand a few key things. First is the fact that a single hex digit is 4-bits wide or a nibble or a half of a byte. In our case 4 is a half of a byte and 8 is the other half of the byte. Together they form a byte and in our case a valid ascii char code.
Let's visit the online ascii table.
Second, we need to understand what the machine code translates to. Let's look up what 48 is in hex. We see that it is a capital 'H'. That maps perfectly as you see in the right hand column of the image above we see a 0 and below it the letter H.
Obviously 65 hex is 'e' and so on and so forth. You can extrapolate the rest for yourself now that you have a basic understanding of what you are looking at.
Let's now define a breakpoint on main and execute this binary to verify in fact that when we continue on from main it will print "Hello World" to the stdout.
[0x55629ca9e4]> db 0x55629ca9e4
[0x55629ca9e4]>
Let us continue and verify our hypothesis. First we continue and break on main.
[0x55629ca9e4]> dc
hit breakpoint at: 0x55629ca9e4
[0x55629ca9e4]>
Now we step again and since there are no other breakpoints we will conclude the execution and verify our result in stdout.
[0x55629ca9e4]> dc
Hello World!
(59575) Process exited with status=0x0
[0x7fb146cb8c]>
Let's exit Radare2.
q
y
y
Let us rerun Radare2 again and this time not run the binary and simply look at the unmapped binary that is on disk.
radare2 ./0x01_asm_64_helloworld
Let's auto analyze.
aaa
Let's seek to main.
s main
Then view.
v
Notice that we have "Hello World!" this time at the unmapped memory address of 0xb48. You notice that when you ran the binary the executable had an offset to this value but the LSB were 48 hex.
I hope this lesson helps you to understand the basics of 64-bit ARM assembly and how to reverse it properly.
In our next lesson we will hack the value.
