Part 31 - x64 Assembly [Part 5]
For a complete table of contents of all the lessons please click below as it will give you a brief of each lesson in addition to the topics it will cover. https://github.com/mytechnotalent/Reverse-Engineering-Tutorial
This lecture will be a bit longer than most however it is important that you all take the time to really code and practice the topics discussed below. Let's review our code:

Let's compile and run:

As we can see from last week we successfully created our simple "Hello World" program successfully.
In prior lessons I touched upon the x64 register set however I will review again with this table:
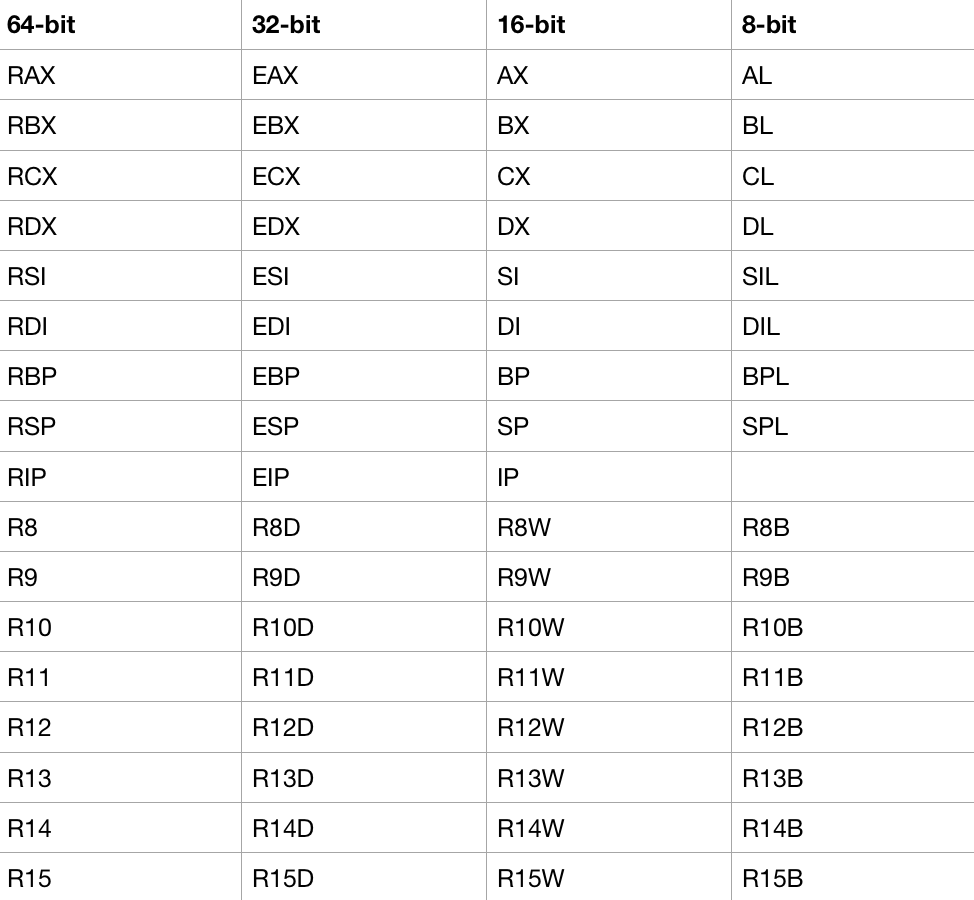
In prior lessons we described what these registers basic functionality consists of however it is important to understand the 64-bit to 8-bit slices of the registers. Registers hold temporary memory. This is the key takeaway here.
We have three sections in Linux-based assembly which consist of a:
.data = consist of data definitions
.bss = consist of variable data allocation
.text = actual code
In our example above we used the label of text not to be confused with the .text section. Our compiler will take all of our labels and determine an actual mapped memory location and replace each label with the memory in the actual binary file.
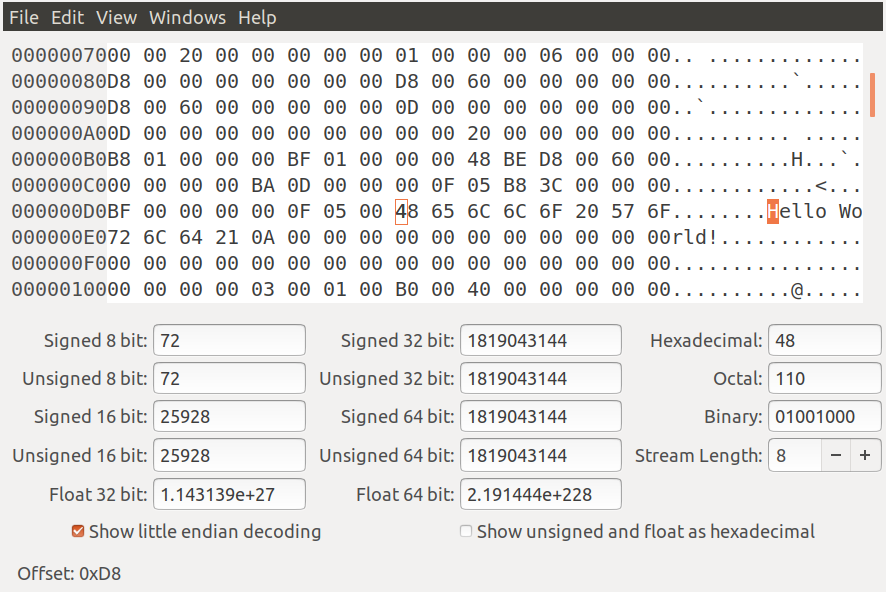
It is important to understand that each string character is a byte in length which is represented by two hex digits. There is an ascii table that you can Google that will show you all of these values. Each hex digit is a nibble or 4-bits long. For example our 'H' is 0x48 and 'e' is 0x65. Let's look at our binary in a hex editor to illustrate.
In last week's lecture's comments, Aaron pointed out something that is very critical that you understand when looking at Assembly in an Operating System vs Firmware such as the code we created for our Operating System in our prior lectures.
Aaron carefully pointed out in the comments last week that a SYSCALL is completely dependent on the operating system. System calls will differ depending on the OS because each OS has a different Kernel and each have their own vector interrupt tables which have an ID associated with them with a corresponding number value.
A SYSCALL is nothing more then when a binary requests a service from a respective kernel to which will take arguments or a list of inputs. It is important to understand in x64 that System Call arguments or inputs correspond to specific registers:
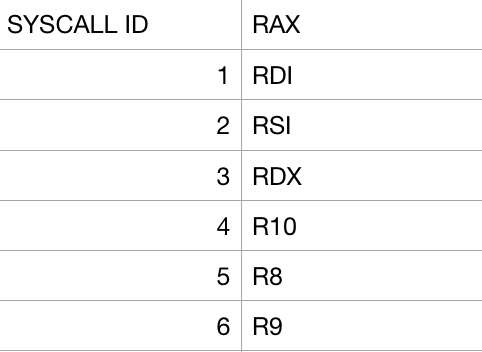
There are 328 SYSCALLS in a traditional linux kernel. As we see above in our code we use both the SYS_WRITE and SYS_EXIT. Let's illustrate:

Please take a moment to look at our code above to see how this works. In SYS_WRITE we load 1 into RAX which is our SYSCALL. We load 1 into RDI which is our first argument which represents our standard output (0 = standard input & 2 = standard error). Our second argument is loaded into RSI which is our text label to which when compiled will have an actual memory address as you will see this in a debugger. Finally our third argument will hold the string length which is 13 in our case and loaded into RDX. As an exercise I want you to write out how SYS_EXIT does the same and keep in mind there is only 1 argument there. PLEASE REVIEW the code above to firmly understand this before moving on!
In addition we have our _start label to which our respective operating system will look for otherwise it will throw an error when it seeks to find an entry point to our code. The global declaration tells the linker the actual address of the data.
Next week we will debug the binary in GDB.