Part 22 - ASM Program 1 [Moving Immediate Data]
For a complete table of contents of all the lessons please click below as it will give you a brief of each lesson in addition to the topics it will cover. https://github.com/mytechnotalent/Reverse-Engineering-Tutorial
I appreciate everyone being patient as it has taken 21 lessons to get to our first ASM program however very necessary background had to be covered in order to fully understand where we begin when developing assembly language.
We are going to create 32-bit assembly programs as most malware is written in 32-bit mode in order to attack the maximum amount of systems possible. Keep in mind even though most of us ALL have 64-bit operating systems, 32-bit programs can run on them.
For the most part we have been working with Intel syntax when it comes to assembly however I am going to focus on the native AT&T syntax going forward. It is very easy to convert back and forth between Intel and AT&T syntax as I have demonstrated in prior tutorials.
Every assembly language program is divided into three sections:
1)Data Section: This section is used for declaring initialized data or constants as this data does not ever change at runtime. You can declare constant values, buffer sizes, file names, etc.
2)BSS Section: This section is used for declaring uninitialized data or variables.
3)Text Section: This section is used for the actual code sections as it begins with a global _start which tells the kernel where execution begins.
Critical to any development is the use of comments. In the AT&T syntax we use use the # symbol to declare a comment as any data after that symbol on a respective line will be ignored by the compiler.
Keep in mind, assembly language statements are entered in one statement per line as you do not have to end the line with a semicolon like many other languages. The structure of a statement is as follows:
[label] mnemonic [operands] [comment]
A basic instruction has two parts of which the first one is the name of the instruction or the mnemonic which is executed and the second part is the operands or parameters of the command.
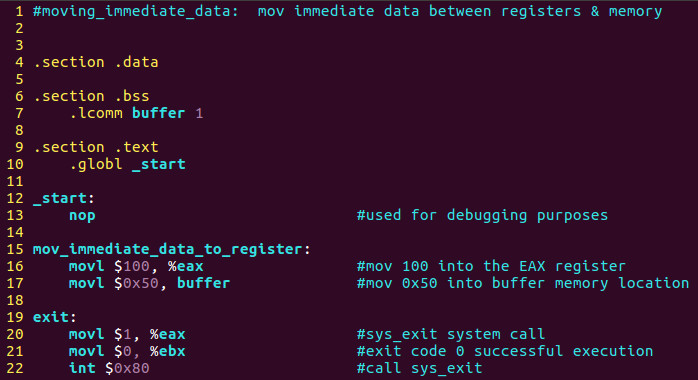
Our first program will demonstrate how to move immediate data to a register and immediate data to memory.
Lets open VIM and create a program called moving_immediate_data.s and type the following:
To compile you type:
as –32 -o moving_immediate_data.o moving_immediate_data.s
ld -m elf_i386 -o moving_immediate_data moving_immediate_data.o
To run you type:
./moving_immediate_data
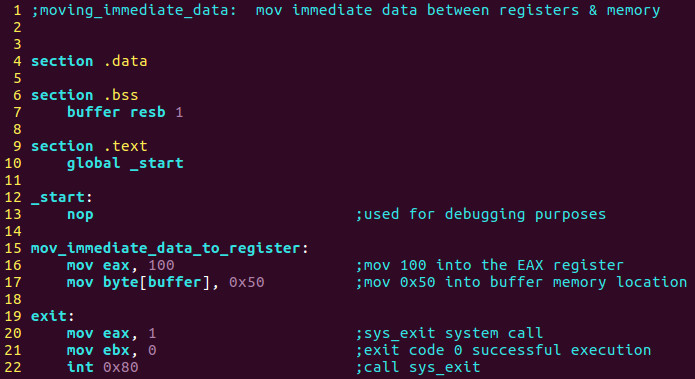
I would like to show you what it would look like in Intel syntax as well. Before we examine this part you will need to type sudo apt-get install nasm in a command prompt which will install the Netwide Assembler:
To compile you type:
nasm -f elf32 moving_immediate_data.asm
ld -m elf_i386 -o moving_immediate_data moving_immediate_data.o
To run you type:
./moving_immediate_data
Ok what the heck! There is no output! That is correct and you did not do anything wrong. Many of our programs will not actually do anything as they are not much more than sandbox programs that we will use in GDB for analysis and manipulation.
Next week we will dive into the GNU GDB debugger and see what is going on under the hood.
I want to take some time and discuss the code at line 20 – 22 in the AT&T version and the Intel Syntax version as well. This set of instructions takes advantage of what we call a software interrupt. On line 20 in the AT&T Syntax, we movl $1, %eax meaning we move the decimal value of 1 into eax which specifies the sys_exit call which will properly terminate program execution back to Linux so that there is no segmentation fault. On line 21, we movl $0, %ebx which moves 0 into ebx to show that the program successfully executed and finally we see int $0x80.
Line 20 and 21 set up the software interrupt which we call on line 22 with the instruction int $0x80. Let’s dive into this a little deeper.
In Linux, there are two distinct areas of memory. At the very bottom of memory in any program execution we have the Kernel Space which is made up of the Dispatcher section and the Vector Table.
At the very top of memory in any program execution we have the User Space which is made up of The Stack, The Heap and finally your code all of which can be illustrated in the below diagram:
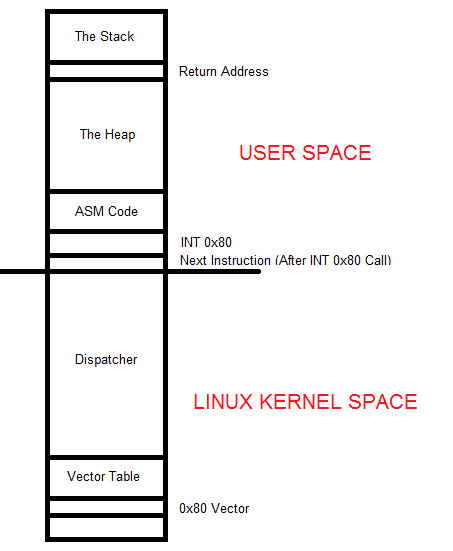
When we load the values as we demonstrated above and call INT 0x80, the very next instruction’s address in the User Space, ASM Code section which is your code, is placed into the Return Address area in The Stack. This is critical so that when INT 0x80 does its work, it can properly know what instruction is to be carried out next to ensure proper and sequential program execution.
Keep in mind in modern versions of Linux, we are utilizing Protected Mode which means you do NOT have access to the Linux Kernel Space. Everything under the long line that runs in the middle of the diagram above represents the Linux Kernel Space.
The natural question is why can’t we access this? The answer is very simple, Linux will NOT allow your code to access operating system internals as that would be very dangerous as any Malware could manipulate those components of the OS to track all sorts of things such as user keystrokes, activities and the like.
In addition, modern Linux OS architecture changes the address of these key components constantly as new software is installed and removed in addition to system patches and upgrades. This is the cornerstone of Protected Mode operating systems.
The way that we have our code communicate with the Linux Kernel is through the use of a kernel servies call gate which is a protected gateway between User Space where your program is running and Kernel Space which is implemented through the Linux Software Interrupt of 0x80.
At the very, very bottom of memory where segment 0, offset 0 exists is a lookup table with 256 entries. Every entry is a memory address including segment and offset portions which comprise of 4 bytes per entry as the first 1,024 bytes are reserved for this table and NO OTHER CODE can be manipulated there. Each address is called an interrupt vector which comprises the whole called the interrupt vector table where every vector has a number from 0 to 255 to which vector 0 starts off occupying bytes 0 to 3. This continues with vector 1 which contains 4 to 7, etc.
Keep in mind, none of these addresses are part of permanent memory. What is static is vector 0x80 which points to the services dispatcher which point to Linux kernel service routines.
When the return address is popped off the stack returns to the next instruction, the instruction is called the Interrupt Return or IRET which completes the execution of program flow.
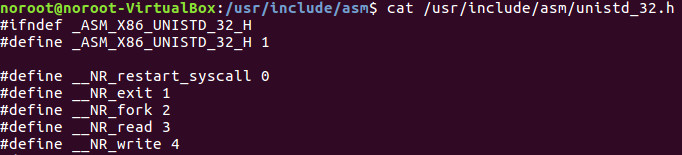
Take some time and look at the entire table of system calls by opening up a terminal and typing:
cat /usr/include/asm/unistd_32.h
Below is a snapshot of just a few of them. As you can see the exit 1 represents the sys_exit that we utilized in our above code.
Starting with this lesson we will take a 3-step approach:
1)Program
2)Debug
3)Hack
Each week we will start with a program like you see here, the following week we will take it into GDB and examine what exactly is going on at the assembly level and finally in the third series of each week we will hack the data in GDB to change it to whatever we want demonstrating the ability to control program flow which includes learning how to hack malware to a point where it is not a threat.
We will not necessarily look at malware directly as I would rather focus on the topics of assembly language programs that will give you the tools and understanding so that ANY program can be debugged and manipulated to your liking. That is the purpose of these tutorials.
The information you will learn in this tutorial series can be used with high-level GUI debuggers like IDA Pro as well however I will focus only on the GNU GDB debugger.
I look forward to seeing you all next week when we dive into creating our first assembly debug!