Part 19 - Boot Sector Basics [Part 2]
For a complete table of contents of all the lessons please click below as it will give you a brief of each lesson in addition to the topics it will cover. https://github.com/mytechnotalent/Reverse-Engineering-Tutorial
We are at the stage where we are going to start integrating real-world code. If you do not have an active linux desktop I would suggest you get Virtualbox and Ubuntu on either your Windows or Mac. I have a prior tutorial that will walk you through this process below. For some reason I am not able to embed the link so please just copy and paste it into your browser.
You will additionally need a text editor for the terminal. I use VIM. You will find a link to set that up as well below.
In addition you will have to install nasm so you may simply type:
sudo apt-get install nasm
NASM is the assembler we will use and we will focus on the intel syntax. First go into the terminal and fire up Vim and type the following:

Remember to type 'i' to insert and then 'esc' and 'wq' to go into command mode and save your file.
The above line simply sets an infinite loop and does nothing more. The loop label is created to which we simply jmp back to itself. This code in itself will compile however it will not run in an OS as it does not trigger what we refer to as the magic number to which BIOS looks to understand this is the end of your boot sector. We will cover more on that in future lectures.

We type the above command assuming you saved your file in vim as bootsector.asm. This will create a binary file to which we will examine the contents within a hex editor. A hex editor is an application that examines each byte of data that is compiled into a file. We will see that our assembly instructions above will ultimately get translated down to their raw opcode values. The processor only understands raw opcodes which are simply operation codes. Below is a link to a table identifying the opcodes. I saved you the effort of referencing the intel dataset as it is literally thousands of pages and several volumes:
http://ref.x86asm.net/coder64.html
Let's use a hex editor like ghex and open up our bin file.
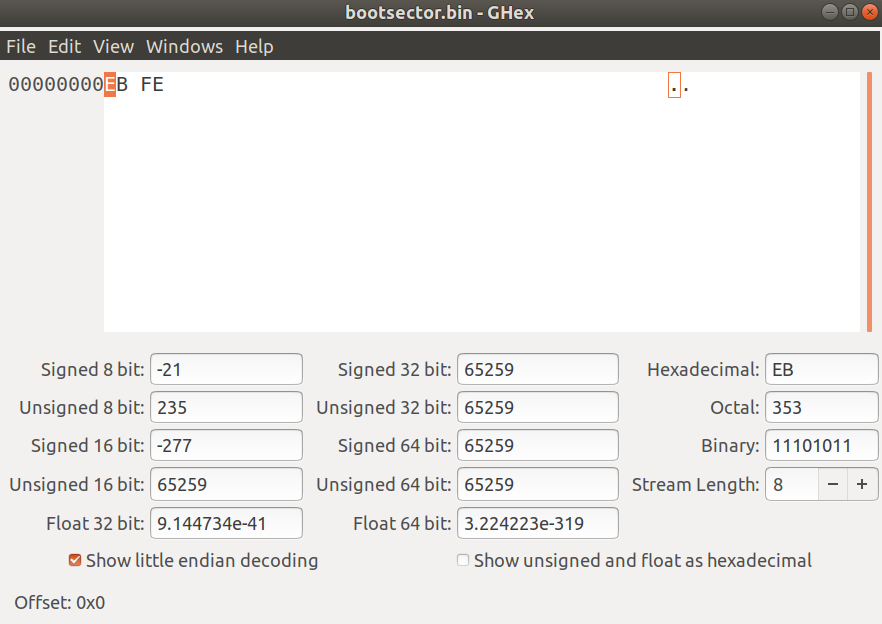
We see EB FE which are hex bytes and each letter is a nibble (a nibble is 4 bits or half a byte). Both EB FE make up two full bytes. Keep in mind the processor reads from disk in reverse byte order such that FE gets read first and then EB. This process is called little endian and is how the x64 processor works.
If you review the table to which I provided the link you will see that FE represents an INC or increment by one. This is our loop value.
Next you will find that EB stands for JMP which is our jump instruction above.
This is alot of information if you are new to assembly. Take it step-by-step and follow along with me in a real linux OS and with each lesson you will get a better understanding of the basics.
Next week we will build upon this lesson by adding some simple data to our binary.